Archive | Craft RSS feed for this section
21 Jun

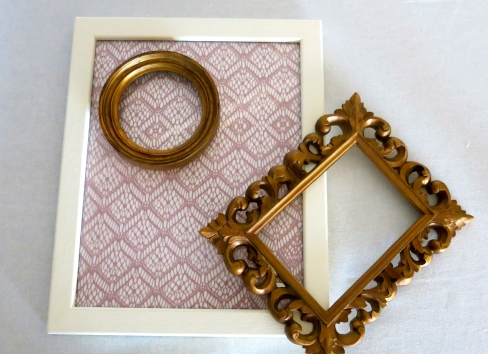
Earlier this week I debuted my repurposed shabby chic tablescape utilizing items from around my apartment. Turning picture frames into unique centerpieces may look simple, but there’s more to it than you think. Here are some tips and steps to follow in order to create a tablescape that is truly eye-catching.

IMG_6241

1. Depending on the size and length of your table, begin with an odd number of frames. I had a small circular table so three frames fit perfectly.

2. Variety is important so play with size, shape and color.

3. You want your frames to look mismatched, but coordinated at the same time so try to establish one main color. I went with gold.

4. Add some texture to your frames by framing some fabric. Not only will this add a color to your tablescape, but if you’re using a solid colored tablecloth like I did, the fabric helps to incorporate a pattern.

IMG_6257IMG_62715. In order to create a three-dimensional look, layer your frames on top of one another.

6. Add any votives, candle holders or vases to complete your look.

IMG_6278IMG_6292 By using picture frames that you already own, not only are you saving money  but you’re creating a custom centerpiece that is unique to you and your personal style. repurposed-shabby-chic-table

11 Jun

IMG_6180Over the past 6 months, I’ve been planning my first large-scale event, the wedding of my friend and her wonderful fiance. Planning a wedding on a budget in six months has not been easy, but it has been the most rewarding experience of my post-grad life. I’m so grateful for this beautiful couple and so honored to be part of their special day and since I recently accepted a full-time event planning position I will get the chance to be an integral part of many couples big days.

IMG_6182IMG_6194This is just one of the many things we’re DIY’ing for the July 5th wedding, but I wanted to give you all a sneak peek of what’s to come. By spray painting wooden letters and plaques from a craft store and strategically tying up some blush colored ribbon, I was able to create a simple Mr. & Mrs sign. Their rustic meets romantic and whimsical mountain top wedding will be the perfect setting for this custom keepsake.  IMG_6169

23 May

DIY Silverware BagSilverware Pouch

1. Begin with an 8 1/2 by 8 1/2 inch piece of card stock.

2. Measure 5 inches from the right side and fold over.

3. Fold the access card stock over the bottom layer and make a crease. Fold the bottom end up about 1/2 inch and make a crease.

4. Measure 4 inches from the bottom of your bag and draw a line. Cut off everything from the 4 inch line up so you have a place for your silverware to peak out.

5. Use hot glue (or a stapler) so your folds stay put.

IMG_5576

I used Martha Stewart stencils to monogram and personalize my silverware bags. Even though my card stock had some great prints on one side, I used some old sheet music to copy one of my favorite songs on the other.

IMG_5588Please note that I measured my bag for plastic silverware and the measurements might be slightly different for real silverware.IMG_5580

10 May

Rubber Band Glass Jars

Unwilling to go outside, I stayed inside on a rainy day. Anyone who knows me well knows that I cannot just sit around doing nothing. I always have to be moving. My eagerness to stay dry and stay active lead me to this very simple project.

What You’ll Need:

1. A glass vessel  (Luckily my boyfriend saved a glass milk jar knowing I’d find someway to use it).

2. Rubber bands

3. Spray paint

Rubber band glass jar 1-4

Some Tips:

1. Do not expect your spray painted glass to last a lifetime. Eventually, it will chip so be sure to handle your pieces with care and use them as display items only.

2. To help your spray paint stay longer try using an outdoor enamel based paint and apply your paint in light coats. Although I’ve never used Krylon Make It Last Clear Sealer it may also be a great option.

3. Let your spray paint dry for 20 minutes max before removing the rubber bands. This will prevent the paint from lifting off the glass. Cutting the rubber bands with scissors rather than pulling them off also helps.

4. Use an X-Acto Knife to clean up any mistakes.IMG_5239IMG_5183IMG_5200

Doily Banner

29 Apr

Doily Banner main photo

What You Need:

Doilies (I used an 8″ and 10″ combination)

Double sided tape

Bakers twine (or any other sort of cord or ribbon you have on hand)

IMG_4874  Doily banner 4 steps

1. Carefully fold over the doily until the pattern lines up perfectly. Only put make a temporary crease as you’re not ready to fold over yet.

2. Once you’ve matched up the doily pattern strategically apply 3-4 small pieces of double-sided tape.

3. Align your twine in the center of your doily.

4. Fold doily in half and press firmly until the tape sticks and pattern matches.

In just a few minutes you’ll have a simple and elegant banner that will bring dozens of compliments your way!

IMG_4892IMG_4967IMG_4982

DIY: Canvas Wall Art

23 Apr

IMG_4814

Since I moved into my apartment I’ve had three frames hanging above my bed of some artwork I created in college. On a recent visit to New York my mother suggested (in the way mothers often do) that a single piece of art would look better. Her suggestion wasn’t appreciated in the moment, but after some serious contemplation I have to admit that she was right. They always are, aren’t they? Instead of paying for an expensive piece of artwork I bought a large white canvas, some circular color coding labels and spray paint. This was the result.

IMG_4760IMG_4763IMG_4768

Since gold polka dots have become sort of my signature look, this project is perfect for me. I went with two different size circles- a 3/4″ and  1″. I came up with a design and applied my spray paint. Once dry, peel off your stickers and enjoy the final product. Artwork that brings my entire bedroom together for under $50 is okay in my book.

IMG_4788IMG_4775IMG_4786 

3 Apr

diy mini note cardsnote cards 51. Cut one 6-by-6 inch square.

2. Using a ruler make two markings: one 1 1/4″ from the left side and one 1 3/4″ from the right side.

3. Flip your square so it’s horizontal and fold each of your markings.

4. Apply double sided tape to the edge of the longer fold ( 1 3/4″ fold) and press until tape is secure.

5. Fold the bottom of your envelope into a triangle like you would a present.

6. Apply a good amount of double sided tape, fold up and press until secure.

7. Now that the bottom of your envelope is secure, begin working on the top. Cut the top layer about 1 1/2″ inches down so the back of your envelope peeks out.

8. Use your shaped sheers to trim the top of your envelope.

IMG_4575 IMG_4583

DIY: Frame Update

25 Mar

I bought three silver frames from my local Housing Works for $3, but when it came time to hang them the silver frame was not working for me. I needed an update to make these thrift store frames look like designer decor.
IMG_4366All you need for this project is your frame, scissors and the adhesive contact paper of your liking. I went with a simple blue checked pattern. Frame Update DIYInstead of using your typical family photos, I framed three shopping bags that I’ve collected over the years. IMG_4403The first frame is an apple picking bag from the local apple orchard in my hometown. The second is a shopping bag from my NYC hair salon. I love their silhouette logo so whenever I purchase my favorite shampoo, I also save my favorite bag. And finally, the third bag is an homage to one of my favorite designers. I’ve saved this Kate Spade bag since my sister bought me Kate Spade gloves for Christmas six years ago.
IMG_4412IMG_4395IMG_4404

Spring Has Sprung

21 Mar

Seeing that yesterday was officially the first day of Spring, I was inspired to create some thrifty Easter decor that would not break the bank. I’m proud to say that I spent a total of  $14 on my Spring tablescape. Here’s how.IMG_4325

I got the idea of using bunny ears as place cards from my own bunny (my French Bulldog, Chip) with his little set of bat ears. Why not take advantage of this iconic Easter symbol by putting those vertical ears to good use? I created my place cards by using things I had around the apartment: white closepins, construction paper, scrapbook paper, markers and a hot glue gun.

IMG_4284

Simply create a bunny ear stencil of your own like I did or use one of the many templates you can find using our friend Google. Cut out your ears, hot glue them to your closepins so they hold your place card in place. You have complete artistic freedom with your place cards. I personally went with monograms and played with stencils.

IMG_4339Nothing says Spring quite like Daffodils.IMG_4355Besides the flowers, candy and green grass I had everything else in my apartment. A soft linen tablecloth works perfectly for Spring. My recycled candle holder and painted mason jar act as nests for my chocolate eggs. I also reused my St. Patty’s Day paint sample napkin rings as well as my pink paint sample dot confetti.

 IMG_4335IMG_4364

It may not be the classiest tablescape in the world, but it reflects what Spring means to me. It’s pastel, pretty and playful.

DIY Napkin Rings

13 Mar

IMG_4256

My desire to create something for St. Patrick’s Day without breaking the bank lead me to create these paint sample napkin rings. I know I’ve been a little paint sample obsessed these days, but there’s just so much you can do with these free little color palettes.

IMG_4231I played with a variety of different colored samples and sizes.IMG_4233I cut my napkin ring to be about 3/4 of the original size to get a better overall look. 
IMG_4236
Using my Martha Stewart Diamond Ring Pattern All Over Punch I added a little something special to the end of each napkin ring.IMG_4237Using scissors cut a slit halfway up one side of your paint sample. Then do the same on the alternate side cutting in the opposite direction. Once this is done fit the two slits together until they look like the photo above. IMG_4250You can play with length, color and pattern.IMG_4251These napkin rings could work for any occasion  The pattern looks delicate like lace and also childlike like a butterfly. I could see it working from everything from a child’s birthday party to a rustic farm wedding. 
IMG_4249

To see more of my paint sample DIY check out:

Will You be My Valentine?

Something Crafty

All That Glitters is Gold & Pink