Tag Archives: DIY

Don’t Miss Out- Subscribe to My New Site!

20 Feb

To all of you fabulous followers: If you want to see more fantastic party inspirations like the one below, please go on over to lindseymevents.com/blog and subscribe to me via email! Nuts & Bolts and Do Me A Favor Blog will no longer be posting and If you want to stay up to date with all my DIY, event decor and other projects, please subscribe to me via email. While you’re there, don’t forget to check out all the other ways to follow me via Twitter, Instagram, Pinterest and my Facebook Page!  Thank you for your continued support!

Screen Shot 2015-02-20 at 5.49.22 PM

Attention All Followers!

1 Aug

To all of you fabulous recent followers: If you want to see more fantastic party inspirations like the one below, please go on over to domeafavorblog.com and subscribe to me via email! Nuts & Bolts will no longer be posting and If you want to stay up to date with all my DIY decor and other projects, please subscribe. While you’re there, don’t forget to check out all the other ways to follow me via my Twitter, Instagram, Pinterest, Bloglovin and my Facebook Page!  Thank you for your continued support!

invitation instagram

XOXO,

Lindsey

Sorry For Any Confusion!

11 Jul

My lovely followers,

I know a few of you expressed concern over not being able to follow my new blog, Do Me A Favor. Unfortunately, since I moved to WordPress.org you will no be able to follow my blog in the same manner you used to. However, the wonderful people at WordPress will be transferring those of you that subscribe to my blog via email to my new site! This means, that my email subscribers will continue to receive email notifications of new posts as they did before, but my WordPress.com followers will only see new posts in their Reader. If you would like (and I would love) you can subscribe to my new blog via email so you can be in the loop on all my new posts.

In addition to subscribing, I strongly encourage you to like my Facebook page as that will also have up to date information. Thank you for your support so we can both continue to follow and inspire one another!

Thank you!


21 Jun

Earlier this week I debuted my repurposed shabby chic tablescape utilizing items from around my apartment. Turning picture frames into unique centerpieces may look simple, but there’s more to it than you think. Here are some tips and steps to follow in order to create a tablescape that is truly eye-catching.

IMG_6241

1. Depending on the size and length of your table, begin with an odd number of frames. I had a small circular table so three frames fit perfectly.

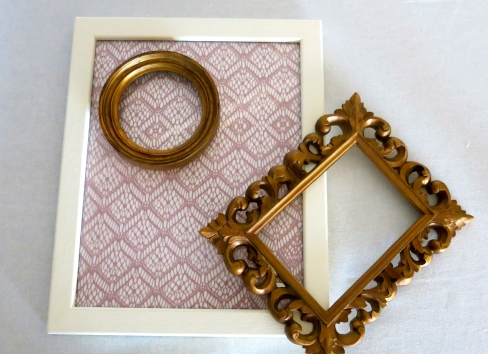
2. Variety is important so play with size, shape and color.

3. You want your frames to look mismatched, but coordinated at the same time so try to establish one main color. I went with gold.

4. Add some texture to your frames by framing some fabric. Not only will this add a color to your tablescape, but if you’re using a solid colored tablecloth like I did, the fabric helps to incorporate a pattern.

IMG_6257IMG_62715. In order to create a three-dimensional look, layer your frames on top of one another.

6. Add any votives, candle holders or vases to complete your look.

IMG_6278IMG_6292 By using picture frames that you already own, not only are you saving money  but you’re creating a custom centerpiece that is unique to you and your personal style. repurposed-shabby-chic-table

18 Jun

Recently I’ve been inspired not by a fabulous vase seen in a magazine, but rather by items I already have in my home. I own so many beautiful things, why not put them to good use? This tablescape in particular is definitely one of my favorites. I used three frames from my gallery wall as the centerpiece of this repurposed shabby chic inspired table.

Repurposed shabby chic tableThe largest frame acts as an anchor for the smaller gold ones. By framing a pink scarf I’m able to bring in a pop of color on my ivory canvas. Tall clear glass candleholders add height and ambience while mismatched plates set the shabby chic tone.

Frame tablescape 1I utilized my large bracelet collection by using them as unique napkin rings. I was able to bring in some turquoise with the bracelets to play off those quintessential pink and turquoise shabby chic colors.

Frame Tablescape 2

I cannot wait to use this idea for a large-scale event someday. By reusing three picture frames, an old scarf and some sparkly bracelets I was able to transform some old products into something new.

11 Jun

IMG_6180Over the past 6 months, I’ve been planning my first large-scale event, the wedding of my friend and her wonderful fiance. Planning a wedding on a budget in six months has not been easy, but it has been the most rewarding experience of my post-grad life. I’m so grateful for this beautiful couple and so honored to be part of their special day and since I recently accepted a full-time event planning position I will get the chance to be an integral part of many couples big days.

IMG_6182IMG_6194This is just one of the many things we’re DIY’ing for the July 5th wedding, but I wanted to give you all a sneak peek of what’s to come. By spray painting wooden letters and plaques from a craft store and strategically tying up some blush colored ribbon, I was able to create a simple Mr. & Mrs sign. Their rustic meets romantic and whimsical mountain top wedding will be the perfect setting for this custom keepsake.  IMG_6169

4 Jun

IMG_6124 Although I love my West Elm media stand it was time for a little update. I look at my TV stand every single day (most likely for more hours than I should) so why not take it up a notch and make it something truly unique? Using the extra Tempaper left over from my new wallpaper job I was able to add some movement to this stationary furniture piece through a bold pattern.

IMG_6139After a little precise measuring, cutting and applying the Tempaper like you would contact paper, I felt like I had brand new piece of furniture. Sometimes a little update makes all the difference.IMG_6136 IMG_6121IMG_6149

23 May

DIY Silverware BagSilverware Pouch

1. Begin with an 8 1/2 by 8 1/2 inch piece of card stock.

2. Measure 5 inches from the right side and fold over.

3. Fold the access card stock over the bottom layer and make a crease. Fold the bottom end up about 1/2 inch and make a crease.

4. Measure 4 inches from the bottom of your bag and draw a line. Cut off everything from the 4 inch line up so you have a place for your silverware to peak out.

5. Use hot glue (or a stapler) so your folds stay put.

IMG_5576

I used Martha Stewart stencils to monogram and personalize my silverware bags. Even though my card stock had some great prints on one side, I used some old sheet music to copy one of my favorite songs on the other.

IMG_5588Please note that I measured my bag for plastic silverware and the measurements might be slightly different for real silverware.IMG_5580

Doggie Style

16 May

This party has not gone to the dogs, but rather celebrates our furry little friends in an upscaled and quirky way. Inspired by my  Banana Peanut Butter Dog Treats, I put together a simple and, of course, budget friendly, dog themed tablescape.IMG_5390Using some plastic dog figurines that I purchased from the toy section of my local convenient store I created a great set of place card holders. All I needed was some primer, gold spray paint and an X-acto knife to transform a little piece of plastic into a classy, but unusual conversation starter. 

Dog Party 1A hot dog seemed like the logical choice for this doggie inspired party, but I upscaled the classic dish  by creating a Banh Mi dog. I put a Vietnamese twist on the hot dog by using pork dogs on a baguette with pickled carrots, cucumber and cilantro. All of this is topped off with some spicy sriracha mayo. Not only do I love the colors on this dish, but the flavors are out of this world. 

Dog Party 2

I put my old school brown paper lunch bags to use by creating “Doggie Bags” for my guests. Using my patterned scissors I cut my brown paper bag in half, adorned it with a paw print stamp and filled it with some delicious sweet potato waffle fries.

Dog Party 3

10 May

Rubber Band Glass Jars

Unwilling to go outside, I stayed inside on a rainy day. Anyone who knows me well knows that I cannot just sit around doing nothing. I always have to be moving. My eagerness to stay dry and stay active lead me to this very simple project.

What You’ll Need:

1. A glass vessel  (Luckily my boyfriend saved a glass milk jar knowing I’d find someway to use it).

2. Rubber bands

3. Spray paint

Rubber band glass jar 1-4

Some Tips:

1. Do not expect your spray painted glass to last a lifetime. Eventually, it will chip so be sure to handle your pieces with care and use them as display items only.

2. To help your spray paint stay longer try using an outdoor enamel based paint and apply your paint in light coats. Although I’ve never used Krylon Make It Last Clear Sealer it may also be a great option.

3. Let your spray paint dry for 20 minutes max before removing the rubber bands. This will prevent the paint from lifting off the glass. Cutting the rubber bands with scissors rather than pulling them off also helps.

4. Use an X-Acto Knife to clean up any mistakes.IMG_5239IMG_5183IMG_5200